| Title | Dialog programming (part 3)—Using tabs | |
| Authors |
James Hassell, StataCorp Jean Marie Linhart, StataCorp |
This FAQ is intended to be a supplement for the documentation rather than a substitute. We strongly recommend reading the online help on dialog programming, which contains information that will not be covered here.
In the previous section, Dialog programming (part 2)—Adding features, we added a number of features to the simple mygenerate dialog that we created in Dialog programming (part 1)—Getting started. This section will focus on adding a new tab or dialog to the mygenerate dialog box. The tab or dialog will contain the controls and programming for the if and in syntax of Stata’s generate command.
Adding an if/in tab will require that we use many of the concepts we have already discussed in parts one and two, and we will use all of the previously written code. However, this tab will use two controls we have not mentioned thus far: the GROUPBOX and SPINNER controls. A GROUPBOX control can be used to make dialogs more aesthetically pleasing or to provide a logical grouping to a series of controls. A SPINNER control is a nice choice when the user must select an integer value. We will discuss specific implementation details concerning the SPINNER control following the code listing below. Also we will explain adding the new syntax to the return string.
Click here to download the final version of mygenerate.dlg.
Once you have downloaded it, save mygenerate.dlg in your Stata adopath, most preferably your PERSONAL directory. If you are unfamiliar with the PERSONAL directory, please see the following FAQ: Where is my personal ado directory. If you downloaded the previous version listed in Dialog programming (part 2)—Adding features, you an overwrite it.
Once you have saved it correctly, mygenerate can be called from the Stata command line by typing db mygenerate.
------------------------- mygenerate.dlg -------------------------
VERSION 16.0

POSITION . . 410 250

DIALOG main, label("generate - Generate a new variable") tabtitle("Main")
BEGIN
  TEXT     tx_gen      10  10   120  ., label("Generate variable:")
  EDIT     ed_gen      10  +20  120  ., error("Generate variable")
  TEXT     tx_exp      10  +25  390  ., label("Contents:")
  EXP      ex_exp      10  +20  390  ., label("Create ...")        ///
           error("Contents")

  TEXT     tx_type     10  +30  200  .,                            ///
           label("Generate variable as type:")
  COMBOBOX cb_type     @   +20  120  .,                            ///
           dropdownlist                                            ///
           contents(type_list)

  CHECKBOX ck_vlab     215 -20  185  .,                            ///
           label("Attach value label:")                            ///
           onclickon(script main_ck_vlab_on)                       ///
           onclickoff(script main_ck_vlab_off)
  COMBOBOX cb_vlab     @   +20  @    .,                            ///
           contents(valuelabels) dropdown
END

LIST type_list
BEGIN
  float
  double
  long
  int
  byte
  str
END

SCRIPT main_ck_vlab_on
BEGIN
   main.cb_vlab.enable
END

SCRIPT main_ck_vlab_off
BEGIN
   main.cb_vlab.disable
END

DIALOG sub, tabtitle("if/in")
BEGIN
  GROUPBOX gb_sub      10  10   390  100,                          ///
           label("Restrict observations")
  TEXT     tx_if       20  +30  20   .,                            ///
           label("if:")                                            ///
           right
  EXP      ex_if       45  @    340  .,                            ///
           label("Create...")
  CHECKBOX ck_in       20  +40  100  .,                            ///
           label("Obs. in range:")                                 ///
           onclickon(script sub_inon)                              ///
           onclickoff(script sub_inoff)
  SPINNER  sp_from     125 @    60   .,                            ///
           min(1)                                                  ///
           max(c(N))                                               ///
           default(1)
  TEXT     tx_to       190 @    15   .,                            ///
           label("to:")                                            ///
           right
  SPINNER  sp_to       215 @    60   .,                            ///
           min(1)                                                  ///
           max(c(N))                                               ///
           default(c(N))
END

SCRIPT sub_inon
BEGIN
  sub.sp_from.enable
  sub.sp_to.enable
END

SCRIPT sub_inoff
BEGIN
  sub.sp_from.disable
  sub.sp_to.disable
END


OK ok1,      label("OK")
CANCEL can1, label("Cancel")
SUBMIT sub1, label("Submit")
HELP hlp1,   view("help generate")
RESET res1
COPY copy1

PROGRAM command
BEGIN
    put "generate "
    put main.cb_type " "
    require main.ed_gen
    put main.ed_gen " "
    if main.ck_vlab {
        put ": "
        put main.cb_vlab " "
    }
    put "= "
    require main.ex_exp
        put main.ex_exp " "
    if sub.ex_if {
        put "if " sub.ex_if " "
    }
    inrange sub.sp_from sub.sp_to
END
------------------------- mygenerate.dlg -------------------------
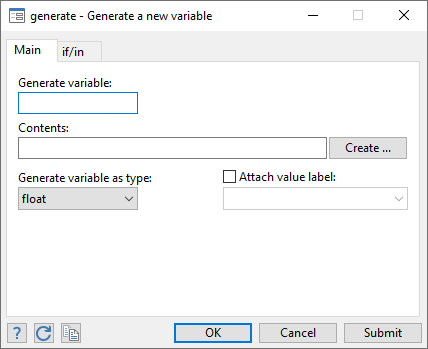
The following screen image was produced by the code above. The if/in tab is selected.

The code above contains a new DIALOG definition that adds a new dialog tab to the earlier version of mygenerate. Recall that tabs are displayed if more than one DIALOG is defined on a dialog box. Notice the new DIALOG is named sub and has a tabtitle of if/in. Also, notice that if/in is the visual representation and that sub is used internally by scripts and programs when controls are referenced.
This DIALOG contains two controls that were not used on the main tab: a GROUPBOX control and a SPINNER control. The basic syntax will not be rehashed for these controls because it is very similar to other controls discussed in detail in parts one and two. It is, however, worth mentioning that the two SPINNER controls allow users to easily select a range when in is specified. All SPINNER controls accept options for the min(#), the max(#), and the default(#). As we are constructing syntax for in, the maximum number of observations for the current dataset should be used for the max option. This value can be obtained by referencing the creturn list, specifically c(N). Also worth mentioning is the use of a CHECKBOX to enable and disable both SPINNER controls in much the same way one was used on the main tab.
The purpose of the if/in tab is to add the correct if and in syntax to our existing return string. To accomplish the task, we have added the necessary code to the command program. Let's look at if and in separately below.
        -  if sub.ex_if {
                put "if " sub.ex_if " "
           }
The command above can be interpreted in the following manner: If the control named ex_if on the DIALOG named sub is filled in (not empty), then the program will enter the code block. The code block says to put, or add, if, followed by a space and the contents of the control named ex_if on the DIALOG named sub, to the return string.
Now that half of the if/in DIALOG has been added to the return string, let us examine the other half.
- inrange sub.sp_from sub.sp_to
This is the first time inrange has been used in these examples. inrange basically passes its arguments to the return string if the numeric controls are not disabled and either the first control does not evaluate to 1 or the second control does not evaluate to _N. In reality, this is true only if both numeric controls are enabled and disabled together. The precise definition of how inrange works when only one control is disabled is somewhat cumbersome. Refer to the Stata Programming Reference Manual if you require a more complete explanation.
Thus far, most of the common dialog programming constructs have been discussed, but Stata options have not been mentioned. The next section will describe how to added options to the return string.