| Title | Dialog programming (part 2)—Adding features | |
| Authors | James Hassell, StataCorp Jean Marie Linhart, StataCorp |
This FAQ is intended to be a supplement for the documentation rather than a substitute. We strongly recommend reading the online help on dialog programming, which contains information that will not be covered here.
In the previous section, Dialog programming (part 1)—Getting started, we created a simple dialog for Stata's generate command. This dialog was called mygenerate, and it was saved as mygenerate.dlg. Our first mygenerate dialog only contained two input controls. These controls allowed the user to create a new variable and to define the contents of that variable. Stata's generate command has other features, too. It has options for setting the type of the new variable and for attaching a value label. Furthermore, it accepts if and in arguments. Wouldn't it be nice if our mygenerate dialog had these features?
This FAQ is going to deal specifically with adding the features mentioned above to our existing mygenerate dialog. The type option and the lblname option for Stata's generate command have one similarity: they offer choices to the user. For example, the type option can include any of the following arguments:
        float
        double
        int
        long
        byte
        str
Likewise, the lblname option generally accepts labels that have already been defined. Therefore, the best presentation for both options will be to offer the user a list of valid choices. A COMBOBOX control is the natural choice.
As stated above, the type and lblname options are similar and are both best presented as a COMBOBOX. That, however, is where the similarity ends. Specifically, the COMBOBOX associated with the type option will be populated with a static list that we must define. Alternatively, the COMBOBOX for the lblname option will need to reflect the value labels that are defined for the current dataset.
The code segment below reflects the additions discussed above for mygenerate.dlg.
Click here to download this version of mygenerate.dlg.
Once you have downloaded it, save mygenerate.dlg in your Stata adopath, most preferably your PERSONAL directory. If you are unfamiliar with the PERSONAL directory, please see the following FAQ: Where is my personal ado directory. If you downloaded the previous version listed in Dialog Programming (part 1)—Getting started, you can overwrite it.
Once it has been saved correctly, mygenerate can be called from the Stata command line by typing db mygenerate.
A side note:
It is always a good idea to use the discard command after you make
changes to dialog code. Using the discard command before loading the
new version of a dialog will clear the memory in the class system and
prevent Stata from entering an unstable state.
------------------------- mygenerate.dlg -------------------------
VERSION 16.0

POSITION . . 410 250

DIALOG main, label("generate - Generate a new variable") tabtitle("Main")
BEGIN
  TEXT     tx_gen      10  10   120  ., label("Generate variable:")
  EDIT     ed_gen      10  +20  120  ., error("Generate variable")
  TEXT     tx_exp      10  +25  390  ., label("Contents:")
  EXP      ex_exp      10  +20  390  ., label("Create ...")        ///
           error("Contents")

  TEXT     tx_type     10  +30  200  .,                            ///
           label("Generate variable as type:")
  COMBOBOX cb_type     @   +20  120  .,                            ///
           dropdownlist                                            ///
           contents(type_list)

  CHECKBOX ck_vlab     215 -20  185  .,                            ///
           label("Attach value label:")                            ///
           onclickon(script main_ck_vlab_on)                       ///
           onclickoff(script main_ck_vlab_off)
  COMBOBOX cb_vlab     @   +20  @    .,                            ///
           contents(valuelabels) dropdown

END

LIST type_list
BEGIN
  float
  double
  long
  int
  byte
  str
END

SCRIPT main_ck_vlab_on
BEGIN
   main.cb_vlab.enable
END

SCRIPT main_ck_vlab_off
BEGIN
   main.cb_vlab.disable
END


OK ok1,      label("OK")
CANCEL can1, label("Cancel")
SUBMIT sub1, label("Submit")
HELP hlp1,   view("help generate")
RESET res1
COPY copy1

PROGRAM command
BEGIN
    put "generate "
    put main.cb_type " "
    require main.ed_gen
    put main.ed_gen " "
    if main.ck_vlab {
        put ": "
        put main.cb_vlab " "
    }
    put "= "
    require main.ex_exp
    put main.ex_exp
END
------------------------- mygenerate.dlg -------------------------
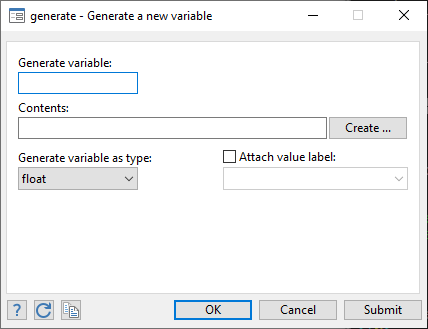
The code above produces the following screen image.

The first change made to the code above was the addition of the new controls to the main DIALOG. Notice that four new controls were added. They are a TEXT control, two COMBOBOX controls, and one CHECKBOX control. The positions were defined for these controls much like they were in the original version of mygenerate. The one notable exception is the use of the "@" symbol, which simply instructs the current dialog control to inherit the respective position or size attribute from the previously defined control. The two examples below have identical meaning.
        Example 1:
          TEXT     tx_one     10  30   200  ., label("Label one")
          TEXT     tx_two     10  +30  200  ., label("Label two")

        Example 2:
          TEXT     tx_one     10  30   200  ., label("Label one")
          TEXT     tx_two     @   +30  @    ., label("Label two")
We will analyze the new dialog code line by line. An explanation for the new TEXT control will be omitted, as that topic was discussed in Dialog programming (part1)—Getting started.
        -  COMBOBOX cb_type     @   +20  120  .,              ///
                    dropdownlist                              ///
                    contents(type_list)
By now, you should be familiar with the positioning of controls, so further explanation will not be given here. The dropdownlist option defines the type of COMBOBOX. Here, the COMBOBOX drops down when the user clicks the control, and it contains a list that cannot be edited. The contents option specifies the name of the LIST that contains the entries to be displayed. Here, the LIST is defined below this DIALOG section and is named type _list.
        -  CHECKBOX ck_vlab     215 -20  185  .,              ///
                   label("Attach value label:")               ///
                   onclickon(script main_ck_vlab_on)          ///
                   onclickoff(script main_ck_vlab_off)
The CHECKBOX control above has two options to handle events associated with clicking the CHECKBOX on or off: onclickon and onclickoff. This type of event handling is useful because it allows the dialog programmer to control precisely how controls interact. Below this DIALOG section, two SCRIPTS have been defined that perform specific tasks. These SCRIPTS will be discussed in more detail below. In the context of this CHECKBOX, the most important issue is that we call a specific SCRIPT when the user clicks this box on or off.
        -  COMBOBOX cb_vlab     @   +20  @    .,              ///
                   contents(valuelabels) dropdown
This COMBOBOX control is similar to the one defined above, except that it uses the valuelabels list, which is defined within Stata. The valuelabels list will always contain the value labels that are defined for the current dataset. Another difference between this COMBOBOX and the one defined above is that the one above is a dropdownlist, and this one is a dropdown. These two types of controls are very similar, the only real difference being that the dropdown option will allow users to type their own entry into the list.
The discussion above mentioned two new constructs, LIST and SCRIPT. In our example, both of these were added just below the DIALOG definition, but they could have just as easily been added above it. The placement is purely a matter of style and does not affect functionality.
        LIST type_list
        BEGIN
          float
          double
          long
          int
          byte
          str
        END
This section defines a LIST that can be used to populate a COMBOBOX or LISTBOX. Simply include the name of the LIST in the control's contents option.
        SCRIPT main_ck_vlab_on
        BEGIN
           main.cb_vlab.enable
        END

        SCRIPT main_ck_vlab_off
        BEGIN
           main.cb_vlab.disable
        END
The section above contains two SCRIPT definitions. A SCRIPT is used to define a compound i-action or sequence of i-actions. The SCRIPT definitions in this example include only a single i-action, but they could have just as easily listed a sequence of i-actions, if necessary. Recall that these scripts were invoked by the onclickon and onclickoff options associated with a CHECKBOX.
        PROGRAM command
        BEGIN
            put "generate "
            put main.cb_type " "
            require main.ed_gen
            put main.ed_gen " "
            if main.ck_vlab {
                put ": "
                put main.cb_vlab " "
            }
            put "= "
            require main.ex_exp
            put main.ex_exp
        END
The section above is very similar to the original version of mygenerate, except that code has been added to handle the syntax of the new features. These lines will be addressed in sequence below.
- put main.cb_type " "
This line adds the type of the new variable and a space to the return string. The type that is added depends on the cb_type that is selected from the main tab of the COMBOBOX.
- if main.ck_vlab {
This line is the beginning of a conditional statement. The statement means that when main.ck_vlab is selected (checked), the program will execute the enclosed block of code; otherwise, it will skip the enclosed block of code.
- put ": "
The code adds a colon followed by a space to the return string. This syntax is necessary for Stata's generate command when the lblname is specified.
- put main.cb_vlab " "
Next the code adds the contents of main.cb_vlab followed by a space to the return string. This specifies the lblname.
- }
The right brace ends the conditional block.
This section started by mentioning some of the features that were missing in the mygenerate dialog. We have now successfully added some of those features, which include the ability to specify the data type and the lblname. However, we have not added the ability to specify if and in. The next section will focus on adding these as a new dialog tab.